


If you're a university professor who wants to quickly start issuing NFTs to your students, then this is for you.
Quick Summary
This step-by-step tutorial will teach you how to issue course certificates as NFTs to your students using no-code tools in less than 20 minutes.
Why use NFTs for certificates
- Proof of Authenticity and Verification: NFT credentials can be shared by students with their employers, and the authenticity of the credentials can be easily verified by the company.
- Token gating: NFT-based certificates can help you gate your content, allowing only those who have attended or passed your course to access it, enabling you to create immersive learning experiences.
- Networking: You can issue certificates as NFTs and use them to create a token-gated community where people can share things with each other. This can help you easily establish a group for your alumni, where knowledge sharing can happen during or after the course.
- Rewarding experience for students: Offering certificates in the form of NFTs can motivate students to complete courses, especially when it comes to limited edition or prestigious courses, enabling them to create their own digital portfolios that can be shared.
How are people using NFTs for certifications

Ed3dao - https://www.ed3dao.com/ed3certification
ED3DAO is a DAO that focuses on empowering educators and promoting their adoption of web3 technologies. They have a few courses on the Blockchain technology and whenever anyone completes these, they receive a certificate of completion in the form of an NFT.

Diego Borgo’s masterclass - How Brands Should Enter the Metaverse and NFT Space
Diego Borgo’s master class provides an NFT to each student who takes the class making them more excited about completing the course and sharing it with the world.
..etc.
Now that you have a brief idea of why NFTs can be a great way to issue course certificates to your students, let's dive deeper into understanding how you can easily implement this flow for your various use cases. We have divided the flow into two parts to make things easier:
Part 1: Designed for university professors
Part 2: For individual course creators
Let's get started with Part 1 of our flow.
Part 1: For professors
If you are a professor or guest lecturer at a university, and want your students to receive NFTs upon completing your course, this guide will help you get started quickly!
How will this work?
The details of your students will be stored in an Airtable database.
Once the students attend your course and pass your exams, with a click of a button on your Airtable, our flow will be able to generate a certificate for that particular student and mint that certificate as an NFT with relevant metadata to their email addresses.
Requirements
- A premium Zapier account(for integrating & automating)
- An Airtable account(to store data)
- An Accredible account(to issue certificates)
- A Crossmint account(To generate a wallet & mint an NFT)
Step 1. Setting up Airtable
To begin, let's set up our Airtable base.
1.1. Create a base called “Batch 1”. This base will contain all the information for a batch. You can choose any name that you want but, remember it.
1.2. Add the following columns to our Airtable base:
- Name : Single line text
- Email : Email Input
- Wallet Address (optional) : Single line text
- Passed : Checkbox
- Last Modified : Last modified time. This will be essential for Zapier to work!
1.3. Add your own data to the Airtable table to test & check the “Passed” checkbox input for these students. This will help us later in our Zapier flow.
You can manually add data to Airtable using your own details. Once you have tested it, feel free to delete this text.

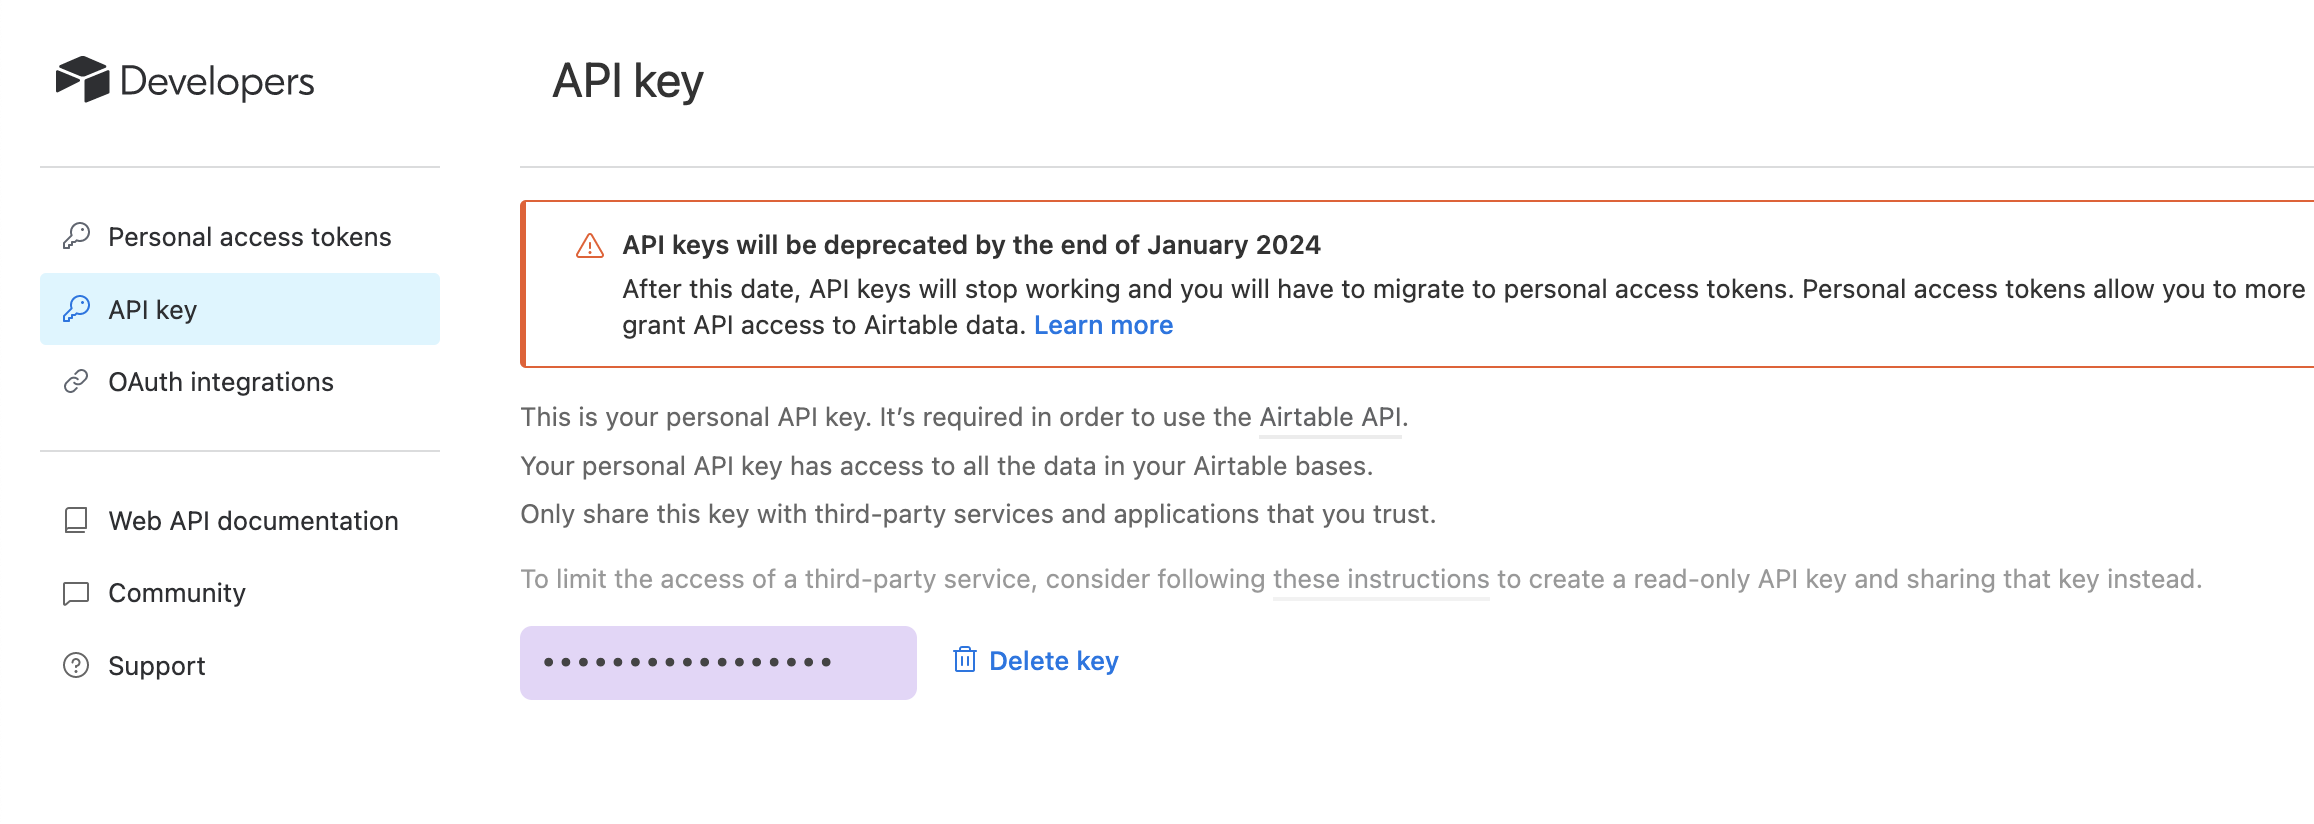
1.4. Now to obtain an API key, first go to the account dropdown and select "Developer Hub" > "API Key". Then, click "Use API key instead" and save the key for later use. This key will be necessary when connecting Airtable and Zapier later in the workflow.
Note: To add details of students to our Airtable, you can either manually enter the data into the table, import a CSV file, or create an Airtable form for the table and circulate it among your students. For more information on creating an Airtable form, check out https://support.airtable.com/docs/how-to-create-a-form-in-airtable.
Step 2. Creating a certificate on Accredible
Accredible is a digital credentialing platform. We’ll be using it to generate certificates for our students.
To create a certificate on Accredible
2.1. Go to your Account dashboard > Groups > Create Group
2.2. Fill out all the details, in Group Appearance section click on the certificate > Select Certificate
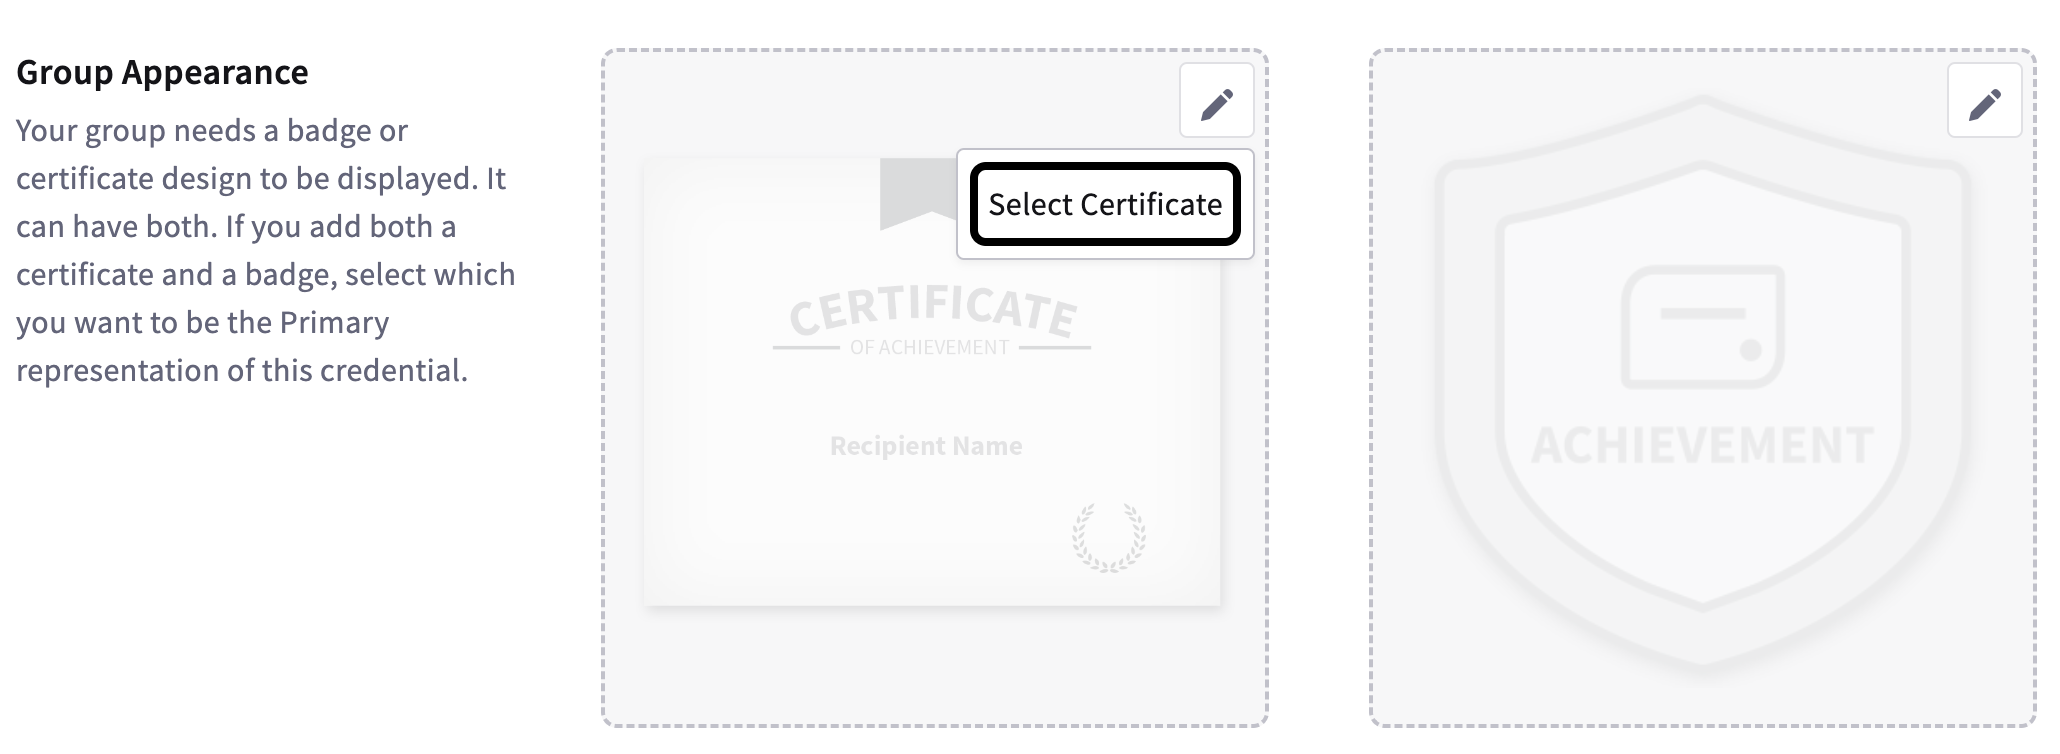
2.3. You can now design the look and feel of your certificate, give this a name and click save. We now have a certificate that we can issue to our students!
2.4. Lastly, we will need an API key for Accredible to connect it with Zapier. To do this go to Setting > General Setting > Manage API Key > Add API Key > Give it a name and choose a permission (Account Wide is default). Copy this API key and save it somewhere.
Step 3. Crossmint setup
Crossmint offers a powerful suite of APIs and tools that can help you create, distribute and store NFTs for your students. To get started we’ll need to generate an API key for Crossmint to connect it with Zapier.
Follow these steps to obtain the keys:
3.1. Go to your Crossmint Dev Console > API Keys > New API Key > Select “nft.mint” scope > Create API Key.
3.2. Save the "client secret" and "Project ID" somewhere. You will need them soon.
Step 4. Setting up the Zapier flow
Zapier automates tasks by connecting apps and services. We will use it to connect our previous steps and automate everything, enabling this flow to run seamlessly on its own.
A Zap is an automated workflow that connects apps and services. It is triggered by an event and followed by actions.
Let us start by creating a Zap. For that on your Zapier dashboard click “+ Create Zap” & give this Zap any name that will help you to identify this flow.
Now we’ll need to connect the flows we discussed in this tutorial and add some logic to things. To do that we need to do a few things :
4.1 Airtable
1. Choose Airtable from the list as your trigger.
2. For the Event select “New or Updated Record” from the dropdown. This tells Zapier to trigger our flow whenever a new Airtable record is created or updated.

3. In the account’s section choose “+ Connect a new account” and follow the instruction. You’ll need to add the API key we generated above in this step.
4. For the trigger add the following details
- Base: Select the name of the Base we added in the Airtable. In our case it is “Batch 1”.
- Table: Select the name of the table that contains our data in this base. By default it’ll be “Table 1” unless you modify it.
- Which timestamp field should this Zap use to check for updates?: While adding the Airtable columns we had added “Last Modified” as a column. Select it from the dropdown.
5. Click continue and test the trigger. If everything works well you’ll be able to see something like the image below. Our Airtable is now successfully linked with Zapier.
4.2. Filter by Zapier
Perfect we have our trigger ready, let’s add our first Action that will tell our Zap to only proceed with the certificate generation and NFT minting when you select “Passed” in the Airtable table for a student. To do that
1. Select “Filter by Zapier” from the Zapier Action popup.
2. In the “Filter setup & testing” add the following filters:
- Only continue if….
- Select “Passed” airtable variable from the dropdown
- Select “(Text) Contains” - “true”
Add an “Or” filter and then
- or continue if….
- Select “Passed” airtable variable from the dropdown
- Select “(Text) Contains” - “1”
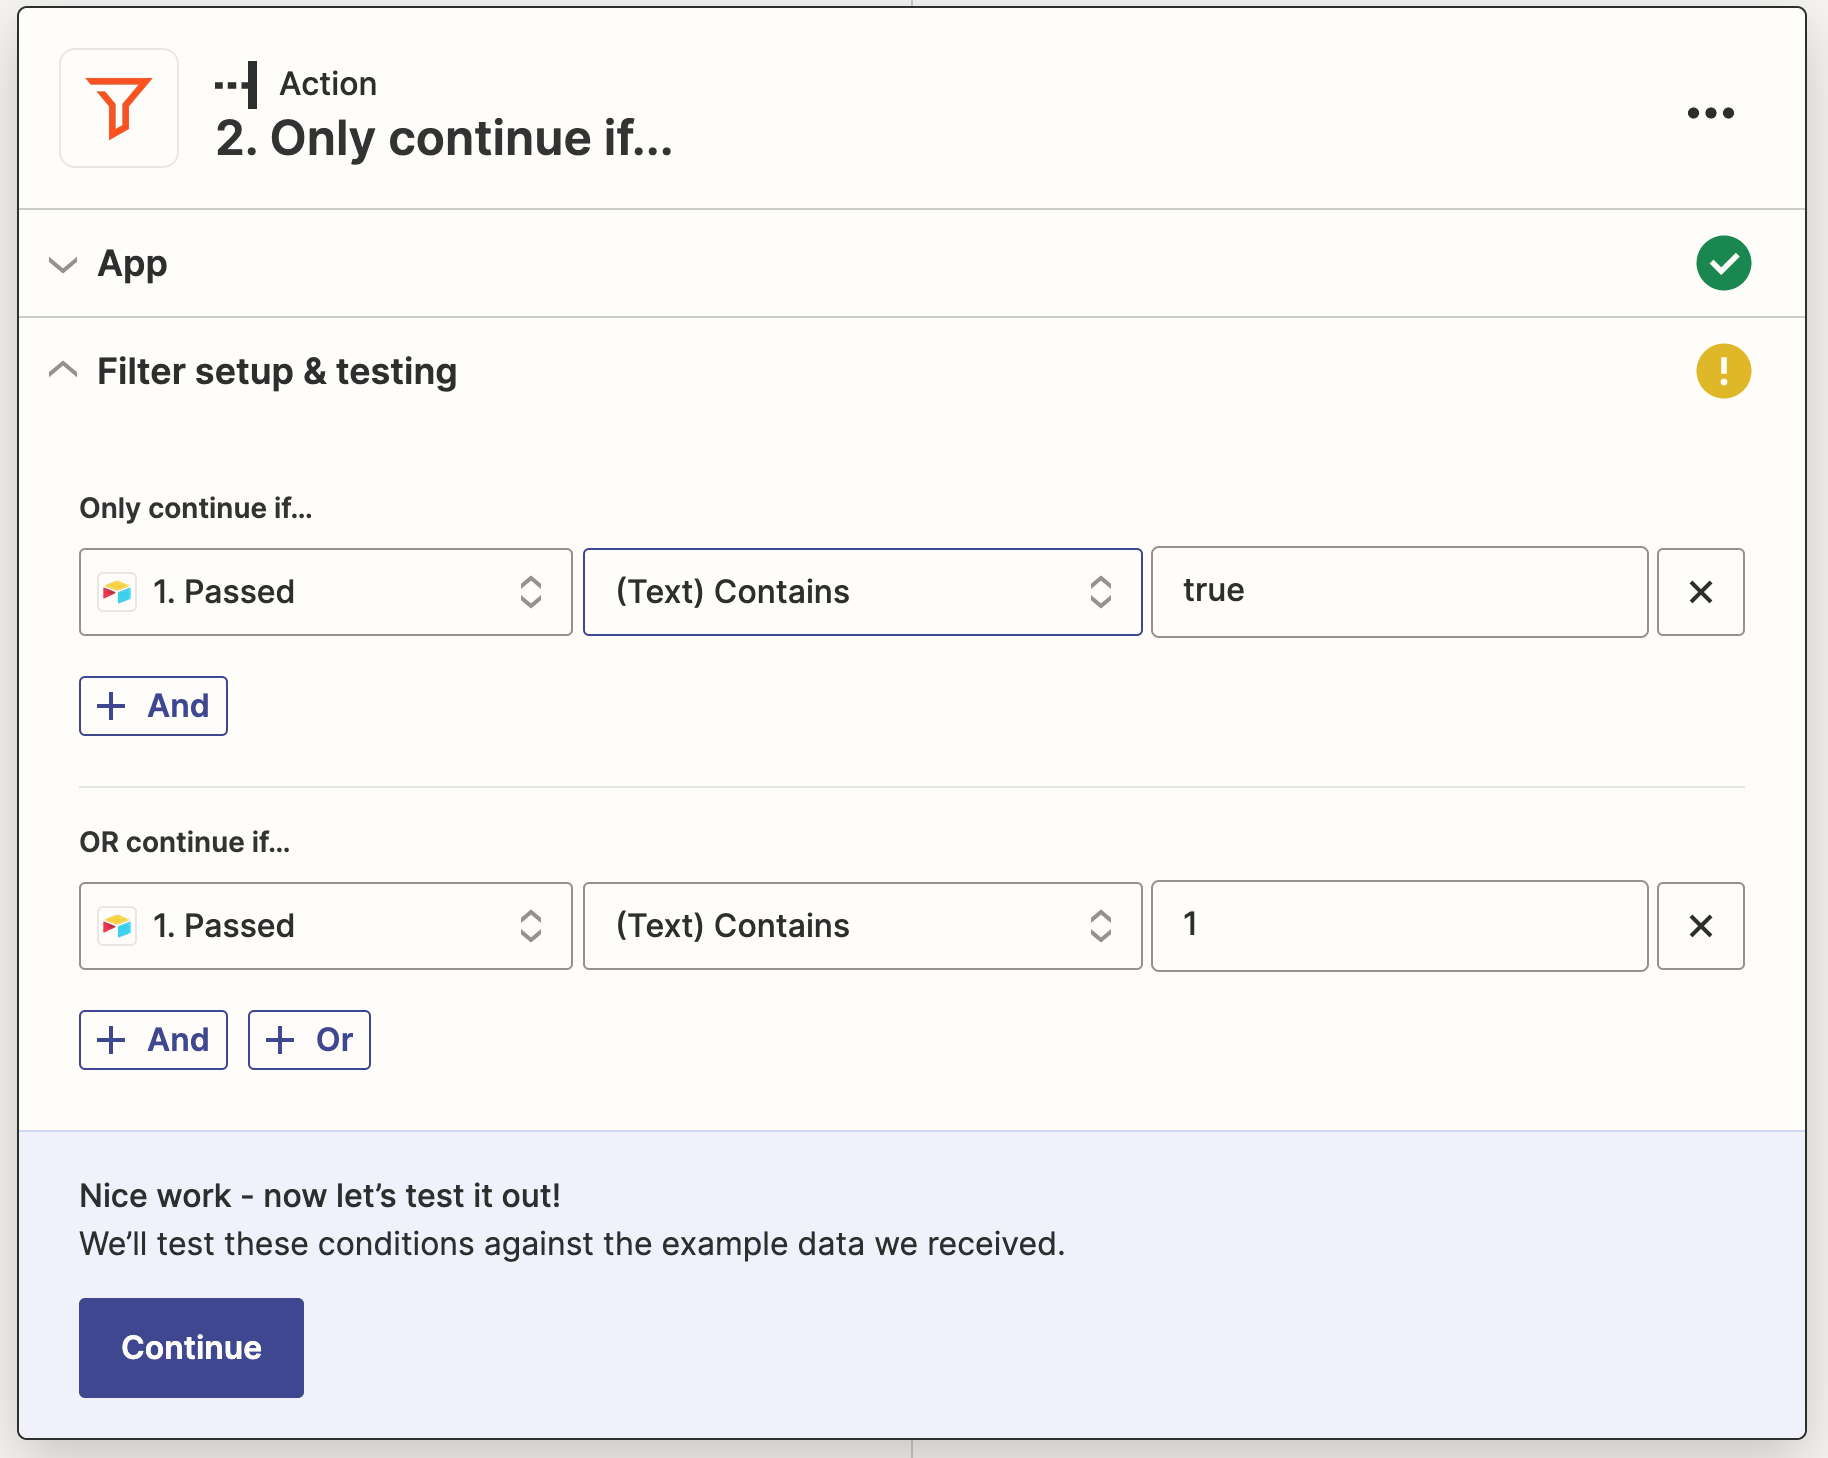
Note: We have included two similar clauses because Zapier Filter can behave strangely with Airtable checkbox inputs and this provides a simple fix for that. Make sure you’ve added both of these clauses to not encounter random bugs later on.
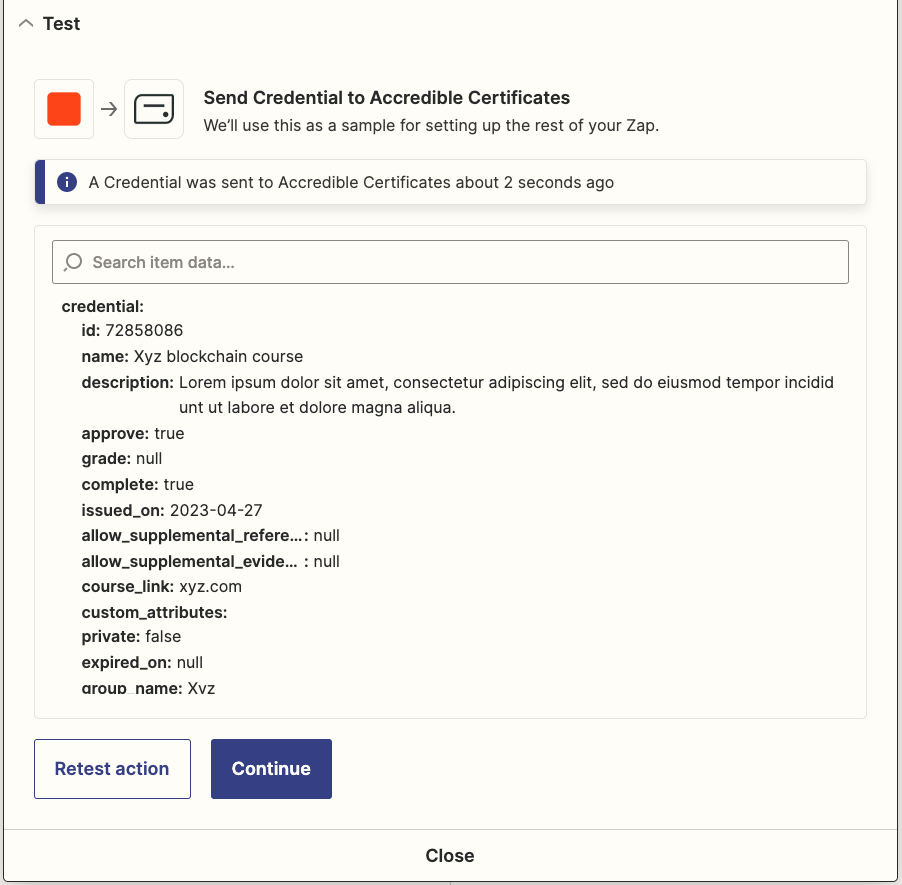
4.3. Accredible
Once a student has passed, the following steps will be triggered to generate a certificate for them:
1. Select "Accredible Certificates" from the Action popup.
2. In the Event, select "Create Credential." This will generate a certificate with the inputs we give Zapier, using data from our Airtable account.
3. Connect your account with Zapier by adding the API key.
4. In the "Actions" section, add the following:
- Cohort Name: Choose the name of the group we created for our Accredible account in the previous step. For us, this is "Batch 1."
- Recipient Name: Select the name of the student from the Airtable variable here.
- Recipient Email: Choose the email address of the student from the Airtable variable here.
- Course Name: Type the name of your course here.
- Course Description: Describe your course here in a few sentences.
- Issue Date: Select "Airtable: Last modified" from the dropdown. This will set the issue date to the time when you pressed "Passed" on your Airtable.
- Add more details if needed. For more information on different fields, check out this link: https://help.accredible.com/how-do-i-setup-the-zapier-integration
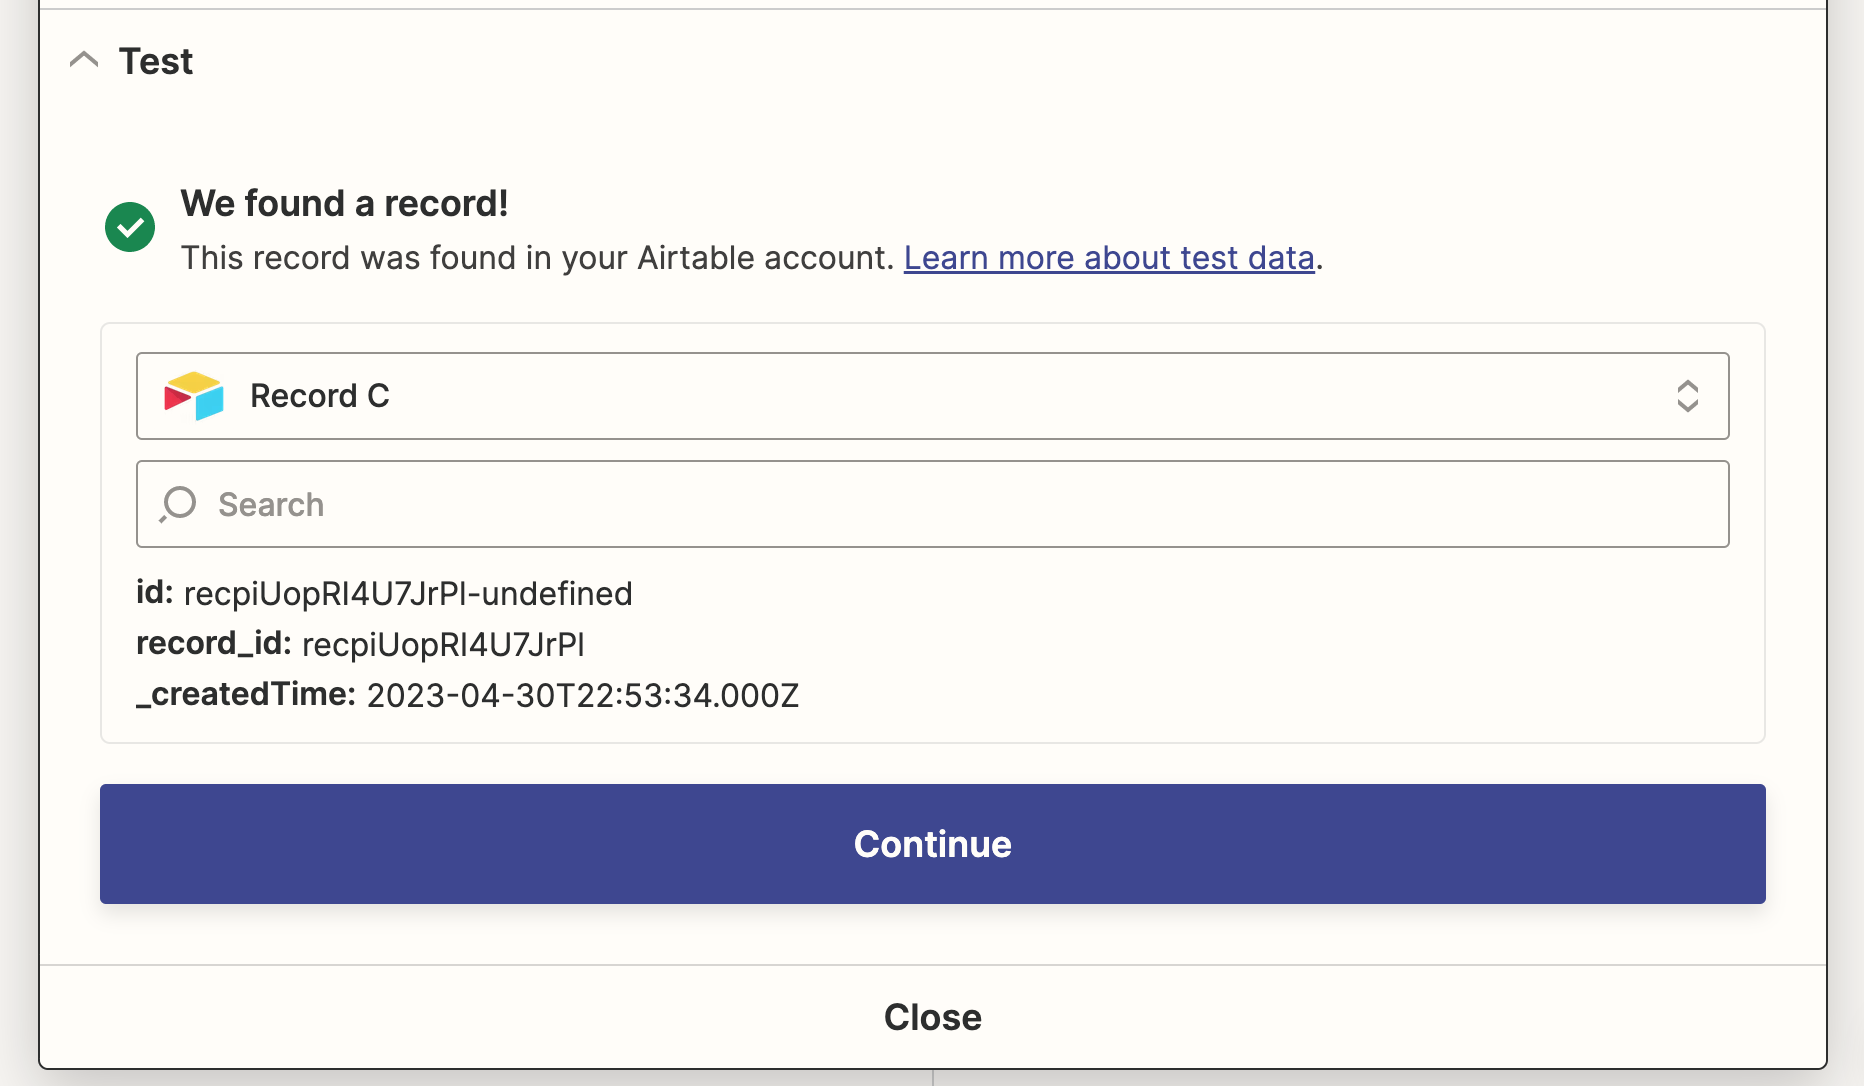
If you’ve done everything mentioned, we should be able to generate a certificate for our user from Airtable. The response we get once we test this action should look like this in our case.
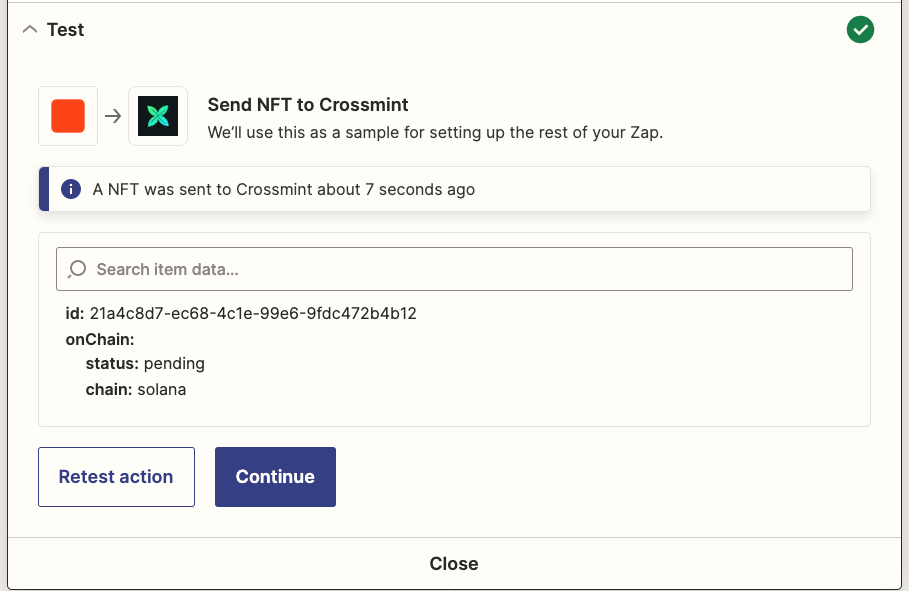
4.4. Crossmint
Now since we are able to generate a certificate from the information we provided in the previous step. We’ll be adding a Crossmint Action now & then will be minting the Certificate that was generated using Accredible to the email address of the student who passed.
To do that follow the step below
1. Select "Crossmint" from the Action popup.
2. In the Event, select "Mint an NFT"
3. Connect your account with Zapier by adding the API key we generated for Crossmint in the tutorial above.
4. In the "Actions" section, add the following things
- Collection ID : Select the name of the collection from the dropdown. This will be default right now but we recommend creating an NFT collection from your Crossmint dashboard first for your Batch. This will enable you to do a lot more with your NFT collection in the future.
- Chain : This can either be Solana or Polygon. Note : For this tutorial we’re minting NFTs for the Solana chain but feel free to change this if needed. Solana supports compressed NFTs that can keep minting cost low. Read more about compression NFTs here - https://docs.crossmint.com/docs/mint-compressed-nfts
- Mint to : Select “email” from the suggestions dropdown. Note : You can also select Wallet address here too if your students will have a wallet by default. To do that you’d need to add an additional column into your Airtable that is “Wallet”.
- Email or wallet address : Select the Airtable’s “Email” response from the suggestions. This will mint the NFT certificate to our student’s email address.
- Title : Add the title of the NFT here that you’d want. This in our case would be the course name. You can also, select the Accredible’s “Credential Name” response from the suggestions. This will ensure that the certificate name from Accredible is also the name of the NFT we issue.
- Image URL : Select the Accredible’s “Credential Certificate Image Preview” response from the suggestions here. This will ensure that the certificate and the image for it we generated in the previous step is minted as NFT.
- Description : Select the Accredible’s “Credential Description” response from the suggestions or feel free to type your own description here.
- Additional metadata : This works like a key value pair and all the information passed here will be stored in the NFT’s metadata. For now we’ll be adding the name of the person & their email this was issued to here. Feel free to add more details into the metadata if you want like grades, skills …etc.
- Press continue & test action. If everything works well, you’d see something like the image below. Our NFT is now minting and Crossmint will generate a new wallet for the email we had on our Airtable and then mint an NFT to that wallet.
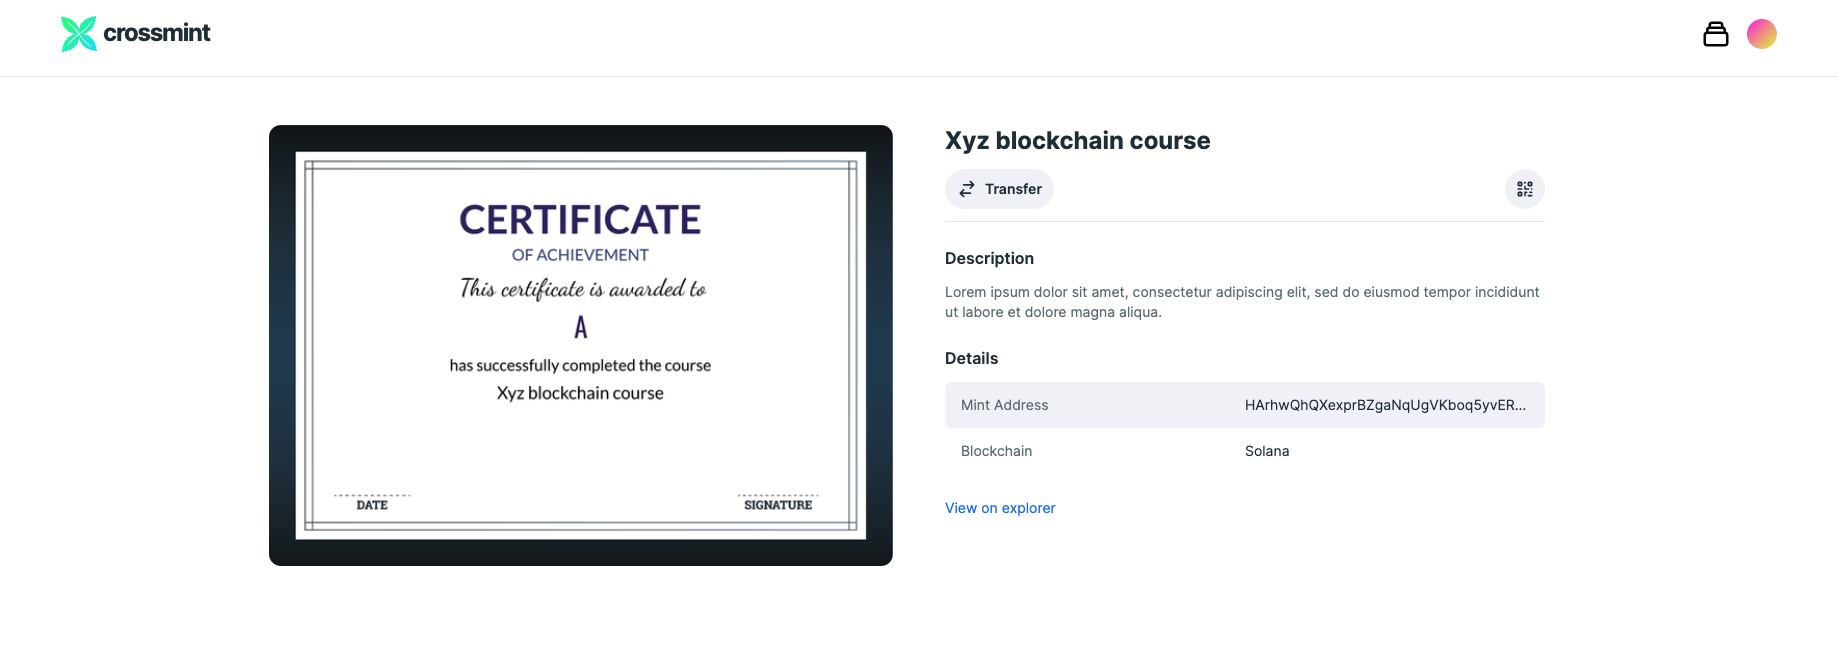
Once you have tested this action and if there were no errors, Crossmint would have generated a wallet for your email(if it doesn’t already exist) and you should be able to view the NFT we just minted in your wallet by going here - crossmint.com/signin and logging in with your email address directly.
You should see something like this once you login & click on your NFT.
4.5: Sending an Email notification upon NFT minting (optional)
Now we have minted our certificate as an NFT, Congratulations 🙂.
It is important to note that Crossmint does not send a confirmation email when you deliver an NFT to an email address via the mint API.
In this case, if you want to send an Email to your students then there are a lot of ways to do this. Zapier has a ton of integrations with email marketing tools like SendGrid, Mailchimp, Gmail …etc.
To make it super easy to setup email notifications in this step we’ll be using Gmail(you can use any other service to send mails too) with Zapier to trigger emails for each NFT that gets minted. Follow the steps below to do this :
1. Select "Gmail" from the Action popup.
2. For the Event select “Send Email” & click continue.
3. Now, in the Account section click “+ Connect a new account”. Zapier will take you to your Gmail login page. Select the email you’d want the emails to be sent from & click “Allow” to grant Zapier permission to send emails on your behalf. Your Gmail should now be linked with Zapier.
4. In the Action’s section add the following details(feel free to add more inputs if necessary)
- To : Select the email from the Airtable response from the dropdown.
- From : Select the email address you just connected with your Zapier from the dropdown.
- From Name : Type your name here or any name that you’d want the email receiver to see.
- Body Type : Select “plain” from the dropdown here. Note that you can also add an HTML email template here. If you already have an HTML-based email template, select "HTML" in this field.
- Body : This will contain the information that you’d want your students to receive. To make this easier you can use this example template when sending email notifications to your students.
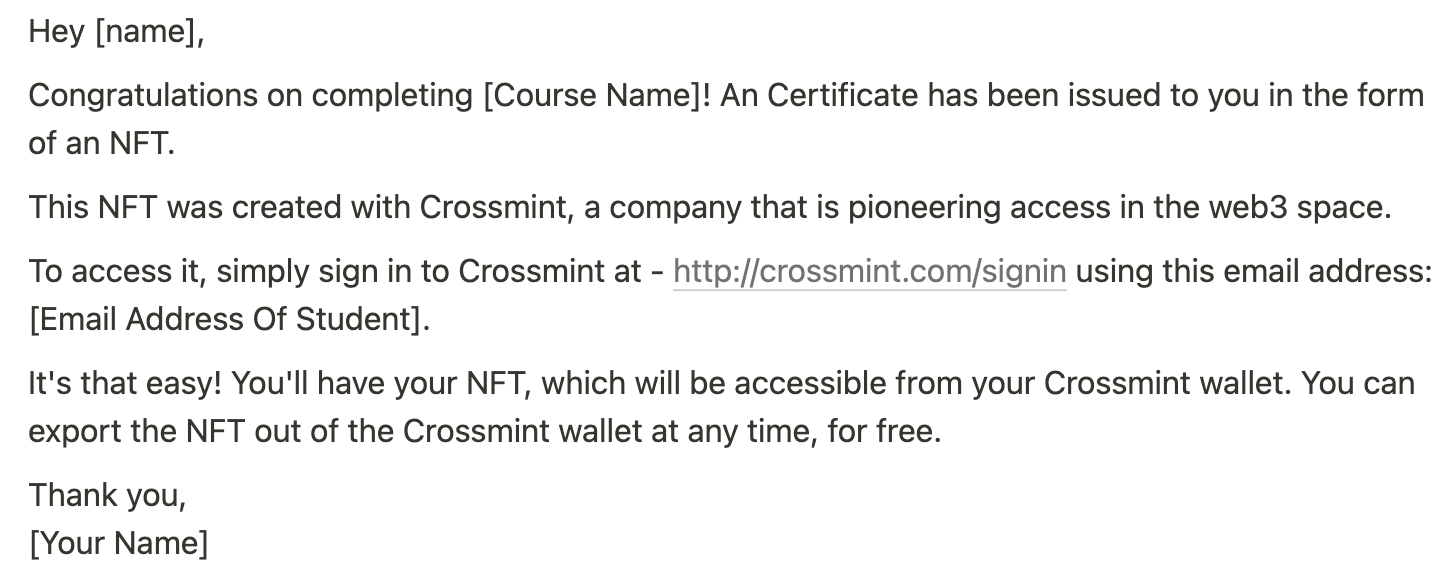
- Click continue & test action. Now you should have received an Email with all the details regarding your NFT.
4.6: Testing and Publishing Our Zap
Finally we were able to generate certificate for our student when they pass, mint that NFT, notify the student on their email address about how they can access & view their NFT. If you did all this & everything works well, congratulations! The last thing that you need to do now is to publish the Zap so that you never have to worry about this flow ever again and everything works automatically in a seamless manner.
To enable a Zap to always keep running, in the navigation bar, you should see a switch that would be “Off” by default. You need to enable it.

Now this Zap will always keep running and will wait for any new updates on your Airtable, whenever that happens, this Zap should get triggered.
Conclusion
We hope this tutorial has helped you get started with minting Certificate NFTs for your students. If you have any questions, feel free to join our Discord and ask there. We would love to hear about what you build with this knowledge!
Alternatively, if you are a digital course creator who wants to issue certificates to your students in the form of NFTs, please follow Part 2 of this tutorial for more details.


